Image optimization is the process of reducing the file size of an image while still maintaining the quality of the image. This is important for SEO because smaller file sizes mean faster load times, and faster load times mean better ranking in search engines.
First, they give search engines important contextual information about the topic of the page. Second, when images are loaded faster, the page as a whole loads faster, improving the user experience.
There are a number of ways to optimize images for SEO. The most common method is to compress the image file. This reduces the file size without reducing the quality of the image. Other methods include using the correct file format, choosing the right resolution, and using alt text.

10 different steps to optimize images for SEO
Now, I’ll break down 10 different steps you can take to optimize your images for SEO success.
1. Resize images
The first thing you should do is resize your images. Large images take longer to load, which can slow down your website. You should resize your images so that they are no larger than the width of your content area. You can do this in a photo editing program like Photoshop or PicMonkey.
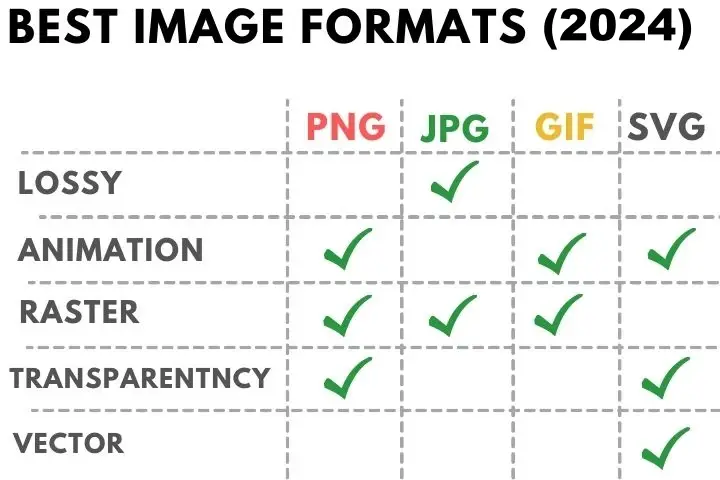
Choose the right file format
There are a few different image file formats, but the two most common are PNG, JPG, GIF, and SVG images are better for photos, while PNG images are better for images with text or line art. You can learn more about the different file formats here.

Compress images
Once you have your image file format and size figured out, you need to compress your image. Compressing an image means reducing the file size without reducing the quality of the image. This is important because smaller file sizes mean faster load times.
There are a few different ways to compress images. One is to use an online tool like:
Online Image optimization tools
- Affinity Photo
- FileOptimizer
- Gimp
- ImageOptim (Mac only)
- JPEG Mini
- Kraken (bulk compression)
- OptiPNG
- Paint.NET
- Pixlr (JPEG optimization)
- Trimage
WP plug-ins for image optimization
- Yoast SEO
- Rank Math SEO
- EWWW Image Optimizer
- ImageRecycle
- Optimus Image Optimizer
- ShortPixel
- TinyPNG
- WP Smush
Test speed after optimization
After you have compressed your images, you need to test your website speed to see if the image compression has actually improved your load time. You can do this with a tool like:
It’s a good idea to check your website page speed after you compress images because once your site is optimized for all the different web browsers and standards, it’s important to go back through and check your page speed scores. This ensures that all Internet users are able to see a website properly without any issues.
2. Optimize image file names
Your image file name is important for image SEO. When you save your images, be sure to use keywords in the file name. For example, if you have an image of a black cat, you might save the file as “black-cat.jpg” instead of just “black.jpg.”
This helps search engines understand what the image is about and helps them index your images properly.
3. Add alt text
Alt text is the text that appears in place of an image if the image can’t be displayed. It’s also used by screen readers to describe the image to people who are visually impaired.
Alt text should be descriptive and include keywords that you want to rank for. For example, the alt text for the image above could be “black cat.”
If you’re using WordPress, you can add alt text to your images when you upload them. If you’re using another CMS, check with your developer to see how to add alt text.
Include images in sitemaps, if you want your images to be indexed by search engines, you need to include them in your sitemaps. Sitemaps are files that tell search engines about the pages on your website and the hierarchy of those pages.
4. Optimize the image title
The image title is the text that appears when you hover over an image. Like the file name and alt text, the image title should be descriptive and include keywords.
If you use WordPress, the image title should be added to your posts. If you use a different CMS, check with your developer or webmaster how this is done.
5. Add captions
Captions are the text that appears below an image. They can be used to provide more context for an image or to break up text on a page. Captions should be brief, descriptive, and include keywords.
6. Use royalty-free images
If you’re going to use images from another source, be sure to use images that are royalty-free. This means that you won’t have to pay for the use of the image and you won’t have to worry about copyright infringement.
There are a number of websites where you can find royalty-free images, such as:
7. Ensure that the image fits with the text
When you’re adding images to your posts, be sure that the image is relevant to the text. This helps improve the user experience and can also help you rank for related keywords.
Because Images work best with text, this means that you want to use images that tend to be popular and timely.
You May Also Like: Ultimate SEO Techniques for Beginners
8. Include image structured data
In order for search engines to understand your images, you need to include image structured data. Image structured data is code that tells search engines about the image, such as the title, caption, alt text, and file name.
You can add image structured data using the schema.org standard. This can be done by adding a few lines of code to the <head> section of your website. You can find more information about how to do this here.
9. Add a watermark
If you’re worried about people stealing your images, you can add a watermark. A watermark is a logo or text that is added to an image. This can help to deter people from stealing your images and can also help promote your brand.
10. Use site maps
If you want your images to be indexed by search engines crawlers, you need to include them in your sitemaps. Sitemaps are files that tell search engines about the pages on your website and the hierarchy of those pages.
You can create a sitemap for your images using the Google Image Sitemap Generator. This tool will create a sitemap that you can submit to Google. However, before you submit your sitemap, be sure to read Google’s guidelines on the sitemap.
Finishing Touch
If you’re struggling to get your website to rank higher in search engines, then image optimization should be a priority. By following the tips in this article, you can improve your image SEO and help your website rank better on Google and other search engines.
Please note: The above online tools added to this post are suggested by the author. He loves helping WordPress beginners get started with photography websites. Not the CMI editorial team. So, feel free to find and use the ones you like the best.


Great tips! Image optimization is crucial for SEO in 2023, and this blog post covers all the latest techniques.”
Thanks Salma!